Abstract
In this tutorial, you will learn how to install the rock widget collection and Vizkit which are libraries for displaying online data and log data.
Package / Package Sets
Every repository which contains libraries, widgets, plugins, orogen tasks or orogen deployments is called a package. They are organised in package sets which define for autoproj how to download and install the containing packages.
In this case, we want to install two libraries called ‘vizkit’ and ‘rock_widget_collection’. For this we first check if the packages are defined in one of the known package sets. To do so, call on the command line (do not forget to source env.sh first):
autoproj show gui/rock_widget_collection
autoproj show gui/vizkit
If the packages are known to autoproj, but not checked out, autoproj will report:
source package gui/rock_widget_collection
  this package is not checked out yet, the dependency information will probably
  be incomplete
In this case you can jump to the section below Installing Packages.
If autoproj reports that it cannot find a match for the packages, go to the section Adding Package Sets
Adding Package Sets
It is assumed that autoproj does not know the desired packages at all. In this case, you have to tell autoproj where it can find the package sets which contain the desired packages. An easy way to figure out which package set contains which package is by looking at the package index . After having found the desired package, copy the displayed rock short definition string into the file autoproj/manifest of the current autoproj installation (click ‘show/hide’). If you are not using the default rock installation, you can also use the displayed autoproj definition string which is independent of rock.
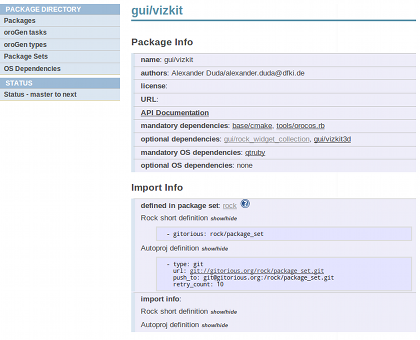
In our case, the website is reporting the following string for the package gui/vizkit which tells autoproj where to find the corresponding package set which in our case also luckily contains the rock_widget_collection. To add this package set to your current autoproj installation, copy the string to the package_sets: section of the file autoproj/manifest.
NOTE: The manifest is following the yml syntax where you have to use blanks (no tabs).
package_sets:
  - github: rock-core/package_set
Now autoproj knows all packages which are part of the rock package sets. If you want to install one of them, go on to the next section.
Installing Packages
It is assumed that autoproj knows the desired packages and autoproj list-config package_name reports that they are not checkout. If autoproj does not find a match for your desired package, go to the section above.
To tell autoproj to install known packages, you have to add them to the layout section of the file autoproj/manifest of the current autoproj installation.
In this case, we want to install the libraries ‘vizkit’ and ‘rock_widget_collection’. For this, add the following two lines to the autoproj/manifest layout section.
NOTE: The manifest is following the yml syntax where you have to use blanks (no tabs).
layout:
  - gui/vizkit
  - gui/rock_widget_collection
Now, if you call amake on the command line, autoproj will download and install the two libraries.
amake
If you want to check if everything went fine, in this case, open a new terminal, go to the autoproj installation, source the environment (source env.sh) and call rock-replay on the command line. A file browser should open and you should see a small help, how to use the command line tool, otherwise vizkit was not installed.
source env.sh
rock-replay
Further reading
Learn how to create your own package set
Learn more about the import of source packages and the source.yml file
Learn how to write your own autobuild scripts
Learn how to write your own package handlers
Learn more about the relationship between source packages and osdeps packages
Summary
In this tutorial, you have learned to:
- Browse packages in the Rock package directory,
- find an oroGen task that provides or consumes a given datatype and
- install the package.
Progress to the next tutorial.